Table of Contents
Virtual Domain Mail Server for Debian 12 (Bookworm)
or How to configure your own Postfix, Dovecot, MariaDB, Lighttpd, phpmyadmin, postfixadmin, dkimpy-milter, spamassassin, wireguard, ssh, bind9 server in Debian 12 with encrypted storage
Say Goodbye to Google, you're setting up the Cadilac of e-mail systems. With it you can host many domains worth of email, give yourself and your family and friends the best vanity addresses in the world, swoop in to save the day for clubs and organizations who don't have the expertise or cash, and do it all on a small budget. You don't need all that much in the way of a server to accomplish it.
Doing it this way is setting up a lot of moving parts. So first think about whether you perhaps want a more turn-key solution like Mail-in-a-box.
That said, at the end of this process you will have an email server you knowv inside and out, one you can add arbitrary domains to, one that is very secure from outside access and which is even somewhat secure from internal (VPS host) access.
Requirements
You will need the following:
- Static IP address with PTR (reverse DNS) capability.☛
- A shiny new domain name and the ability to control the DNS for it.☛
- Server.☛
- A workstation with:
- WireGuard “client”
- SSH Either OpenSSH (9+) or, for Windows, PuTTY (0.78+) / WinSCP (6.2+)
- Watchdog computer/device☛
Design
Components
- Postfix MTA
- Dovecot IMAP/POP3/MDA
- MariaDB SQL Database
- dkimpy-milter DKIM signing and verification milter
- postfix-policyd-spf-python SPF verification tool
- SpamAssassin milter with spamd for UCE control
- Lighttpd web server
- phpMyAdmin web-based MariaDB administration tool
- postfixadmin Virtual Doman eMail control panel
- RoundCube Webmail client
- WireGuard VPN Tunnel
Considerations
Some of the design considerations which may need a little explanation:
Web Server: This design uses Lighttpd. Lighttpd is one of Debian's three officially supported web servers, but today is in the significant minority of installations. The decision to continue with Lighttpd has been revisited several times in the iterations leading up to this one. While it is true that Nginex is slightly more performant on high-resource systems, Lighttpd is still by far the best way to squeeze every megabyte out of your server. If you are running on a VPS and are paying for every megabyte, then Lighttpd is the way to go.
DKIM: OpenDKIM is the DKIM provider most people think of. But it hasn't been updated since Debian 7 in 2015. A new player in town is dkimpy-milter, a switch made with the previous, Debian 11, iteration of this procedure, and it has performed excellently. Even if it is written in Python. 
External Packaging: A major design consideration has been to avoid the use of any third party packaging/dependency systems (Composer, PyPI, Go-anything, etc). Some projects, like RoundCube, have officially adopted Composer as their plugin distribution mechanism. This has no place on a production server, which is what we're making here. All modules, libraries, and plugins are either supplied by Debian packages or are vetted and manually downloaded.
Architecture
Procedure
We are starting from the point where you have a brand new VPS you are starting up for the first time. Even if you've already been using your server for some time, you may want to read these initial steps.
NOTE: Command-lines below assume the use of joe as a text editor. It's a bit more old school than nano, so feel free to adjust to your preferences.
Phase 1 - Batten the Hatches (External Security)
You've got a shiny new VPS or server. Your first consideration is to secure it. The goal here, in the words of András Stribik, is to make NSA analysts sad.
Security goals:
- 256-bit level security throughout (ie:
operations to crack).
- All keymat transfers (including session keys) protected by crypto as strong as the security level of the keymat. 256-bit keymat should never be transported without being protected by crypto that matches its security level
- Post-Quantum safe
- Redundant security - SSH over WireGuard
If your VPS provider is like mine, you'll start with a remote console using something like VNC-over-https. First order of business, make sure you've got nothing listening on your server, and if there is, and you haven't yet ensured it's secure, then shut it down. Take a look at what's listening:
$ sudo netstat -tuelnp
If ssh is running, turn it off until it's configured properly:
$ sudo service ssh stop
Next we install WireGuard and secure SSH. WireGuard gives you the ability to use pre-shared keys, which takes the guesswork out of whether or not any KEX is secure. But since you don't have physical access to the server, you are going to be generating the pre-shared keymat on the server then transferring it off. This means you need to establish a channel offering a level of security equal or higher than the keymat you are transferring. It doesn't make much sense to generate a 256-bit security level pre-shared key on your server, and then transfer it off over ssh that is itself secured with only a 128-bit equivalent KEX.
Once this is done, it's recommended you always communicate with your sever by SSH OVER WireGuard.
SSH over WireGuard Remote Server Procedure
This procedure will let you use an untrusted and insecure connection to create a secure one in a way that is likely safe from even state-level actors unless they employ rubber-hose cryptography. It assumes you don't have physical access to your server. If you do, then you can sneaker-net transfer the keymat and you can likely figure out how to do that:
- Transfer (
wgeton the server) the wireguard interface configuration (/etc/network/interfaces.d/wg0)), the ifup helper script (/etc/wireguard/wg0.up), and setup script (wgnetgen) in the wireguard section below to the server. There is nothing sensitive in those files yet.
wget 'https://wiki.va1der.net/doku.php/wiki:debianmailserver?do=export_code&codeblock=0' -O wg0
wget 'https://wiki.va1der.net/doku.php/wiki:debianmailserver?do=export_code&codeblock=1' -O wg0.up
wget 'https://wiki.va1der.net/doku.php/wiki:debianmailserver?do=export_code&codeblock=2' -O wgnetgen - Over your server's remote console, edit your WireGuard
wgnetgenscript to add the public key from step one, and edit the other parameters as required. Run the script to generate the wireguard keymat and peer (client) configuration files, but don't look at them. Don'tcator edit any of it exceptINITIAL.conf. That is the template for your workstation. Combine the settings inINITIAL.confwith the private key you made in step one and use it to help you finish your initial workstation client configuration. - Bring up wireguard on the server, reboot the server and connect to its wireguard using the temporary initial config on your workstation.
- Properly configure SSH on the server as per the guide below, then enable it. Connect to it from your workstation using the server's wireguard IP address.
- Transfer (using
scp) the permanent wireguard configuration for your workstation to the workstation - this config has your workstation's (semi-)permanent pre-shared key. - Disconnect from ssh, disconnect from wireguard, and on your workstation configure wireguard to use the new .conf.
- Connect your workstation to the server with wireguard using the new config. Connect with ssh over wireguard. Your server and this connection to it is as secure as you can make it remotely. Now transfer all the remaining devices configurations off to your workstation.
- Now edit
/etc/wireguard/wg0and remove the temporary config entry from the bottom.
From now on always connect with ssh over wireguard. From anywhere, no exceptions.
WireGuard
We avoid using wg-quick in this setup. Wireguard is an interface, so we will employ the normal Debian method of adding an interface. Namely, adding a definition to /etc/network/interfaces.d/wg0
$ sudo apt-get install wireguard-tools iptables-nft
$ wget 'https://wiki.va1der.net/doku.php/wiki:debianmailserver?do=export_code&codeblock=0' -O wg0
$ sudo cp wg0 /etc/network/interfaces.d/wg0
$ sudo joe /etc/network/interfaces.d/wg0
Make sure you edit the address to reflect what you want for your network. The examples here assume a network on 10.30.1.0/24. Make sure any change you make above is reflected below.
Also, of course, edit the header signature to reflect your system
The above interface definition references a post-up script for making sure everything is forwarding properly. This is stored as /etc/wireguard/wg0.up:
$ wget 'https://wiki.va1der.net/doku.php/wiki:debianmailserver?do=export_code&codeblock=1' -O wg0.up
$ sudo cp wg0.up /etc/wireguard/wg0.up
$ sudo joe /etc/wireguard/wg0.up
$ sudo chmod 755 /etc/wireguard/wg0.up
Next you'll generate the WireGuard keymat. Here's a script for you to run on the server to generate keys and the config files for the server and clients:
For this part just sudo su - and operate as root. Make an admin folder and a wg0 subfolder to hold your keys and device configuration files.
$ sudo su -
# cd ~
# mkdir -p admin/wg0
# cd admin/wg0
The wgnetgen script needs to be edited with your configuration. You will need:
- The network part of the private IP you chose in the interface config.
- The list of hosts/devices that you are generating client configurations for. You might want one for your watchdog device, and maybe a few extras for future expansion.
- The full (FQDN) hostname of your server. If it doesn't yet have one reachable over the internet, substitute its static ip address.
- Port number, same as in
wg0.up - A DNS server. This is only really needed if you decide to use this WireGuard link as a full-traffic VPN for any devices. Use your server's upstream DNS, or any public one you like.
- The public key from the temporary WireGuard tunnel you made in step 1 above. If you haven't made it yet then:
For Windows
For Linux
# wget 'https://wiki.va1der.net/doku.php/wiki:debianmailserver?do=export_code&codeblock=2' -O wgnetgen
# joe wgnetgen
# chmod +x wgnetgen
# ./wgnetgen
At this point, don't actually look at any of the keymat. Don't edit or even look at wg0.conf. If you do look at it (to make sure the script is operating as it should and/or to check your values) then re-run the script again after to generate new keymat and then use the regenerated wg0.conf. You want to make your connection as secure as it can be before moving any keymat over it. The only file you should look at is INITIAL.conf.
# cp ./wg0.conf /etc/wireguard
# cat INITIAL.conf
Use the settings in INITIAL.conf to help you configure your workstation's initial temporary WireGuard tunnel to the server.
Before you reboot, check to make sure that /etc/network/interfaces is set to read the files in /etc/network/interfaces.d/. The first line should be source-directory /etc/network/interfaces.d/ or source /etc/network/interfaces.d/*
Once you reboot, your wireguard adapter should be up. You can verify with wg and ifconfig.
$ sudo wg
$ sudo ifconfig
You can also see the forwarding rules and make sure that /etc/wireguard/wg0.up was run properly:
$ sudo iptables -L -n --line-numbers -v
Try and connect your workstation's initial temporary tunnel. The above can help you diagnose issues if you have troubles connecting. Once you successfully connect with your temporary wireguard config from your workstation, you can then set up SSH on the server (see below).
Once SSH is properly configured and running, then ssh from your workstation to the server using the server's WireGuard address. Use this connection to scp your workstation's permanent WireGuard config file (with its preshared key) off it and configure your workstation's WireGuard to use it. Once that is done and you're connected over ssh that is over your permanent WireGuard config, then you can get the rest of your device keys and/or config files off and configure the rest of your devices. Remember to use secure means to transfer those configurations to your devices. A sneaker-net is your friend here.
SSH
Goals:
- Secure a channel sufficient to transmit both its own 256-bit session key, and our 256-bit WireGuard pre-shared key with as little degradation to the security guarantee of those keys as possible.
- Protect those pre-shared keys, and any other communication over that channel, from store-now-decrypt-later schemes for when quantum computing becomes available.
András Stribik's excellent work Secure Secure Shell should be required reading. It's old, and events have overtaken it in many areas, but it has excellent explanations of why to configure as we will be.
Since OpenSSH adopted the sntrup761x25519-sha512@openssh.com algorithm, which is two very different KEXs combined into one there is no compelling reason to use anything else, and our configuration becomes much simpler. Interestingly, 99.9% of the botnets that are always trying to probe ssh servers and find weaknesses can't even connect with it right now.
If the ssh service is running, then stop it. Then edit your config:
$ sudo service ssh stop
$ sudo joe /etc/ssh/sshd_config.d/local.conf
/etc/ssh/sshd_config.d/local.conf
The above config file:
- Sets the KEX to sntrup761x25519 only, as discussed
- Sets the symmetric cipher set to chacha20-poly1305 ONLY, which is both faster and more secure than AES
- Allows only members of the ssh group to log in
- Allows X and arbitrary TCP forwarding so you can use your secure channel to tunnel through
- Prohibits password logins
We need to choose a host-key type. The use of sntrup761x25519 is the best we can get for KEX, but without a host-key of similar strength the server is still vulnerable to a MitM attack. Here is where I recommend good old-fashioned RSA, and to go right to the limit with a key size of 16384 bits.
Go to your /etc/ssh directory and generate your host key. If you decided to go with ed25519 then one should already be made for you. If you are going with the recommended 16384 bit RSA, then:
$ sudo sh-keygen -t rsa -b 16384 -P '' -f /etc/ssh/ssh_host_rsa16384_key
Go to your /etc/ssh directory and delete the host keys you won't use. There is no reason any more to have multiple host keys. That just confuses the issue of host key fingerprints when you connect.
Start your ssh service, and check the journal to make sure it started ok:
$ sudo service ssh start
$ sudo service ssh status
For your client, make sure you have a recent-ish copy of OpenSSH (version 9+), TinySSH (20210601+), or for Windows, PuTTY (0.78+) and WinSCP (6.2+). Whenever I use ssh from the command line to talk to my server, I set up a shell script or ~/.ssh/config entry that explicitly connects only with the configured algos. For example:
$ ssh -4 -YC -o "KexAlgorithms=sntrup761x25519-sha512@openssh.com" -c "chacha20-poly1305@openssh.com" -o "HostKeyAlgorithms=rsa-sha2-512" login@10.30.1.1
You should now be ready to connect, hopefully over a WireGuard connection for better security. Remember, your initial WireGuard connection won't have a pre-shared key. So the security of this ssh configuration is doing the heavy lifting for securing the channel to transmit that key. Make it count.
Phase 2 - Internal Security (OPTIONAL)
Running a VPS means that your server's data is available to anyone with access to the hypervisor. Which equates to the lowest-common-denominator tech at your VPS hosting company. The easiest vector for Joe Noseypants is to simply mount your VPS's drive “container” file and go grepping around in it.
You can counter this by locating sensitive data inside an encrypted container. Whole-disk encryption isn't feasible for our use case.
The solution presented here is a btrfs filesystem inside of a VeraCrypt-encrypted container:
For obvious reasons the encryption keys are not kept on the server. This means you need a watchdog computer in a trusted location holding the key. Syncthing is used for signaling the watchdog when the server has been rebooted, and ssh is used on the watchdog to perform the remote mounts.
VeraCrypt
Visit Veracrypt's download page and get the Debian 12 package for veracrypt console. As of this writing that was version 1.26.7.
$ wget https://launchpad.net/veracrypt/trunk/1.26.7/+download/veracrypt-console-1.26.7-Debian-12-amd64.deb
$ sudo apt-get install ./veracrypt-console-1.26.7-Debian-12-amd64.deb
Find out if your VPS includes AES acceleration instructions:
$ cat /proc/cpuinfo
Look for “aes” in the flags.
Create your VeraCrypt container. You can make it any size you like. Experience has shown 10GiB to be a good size - but it depends heavily on the expected number of accounts and, of course, available space.
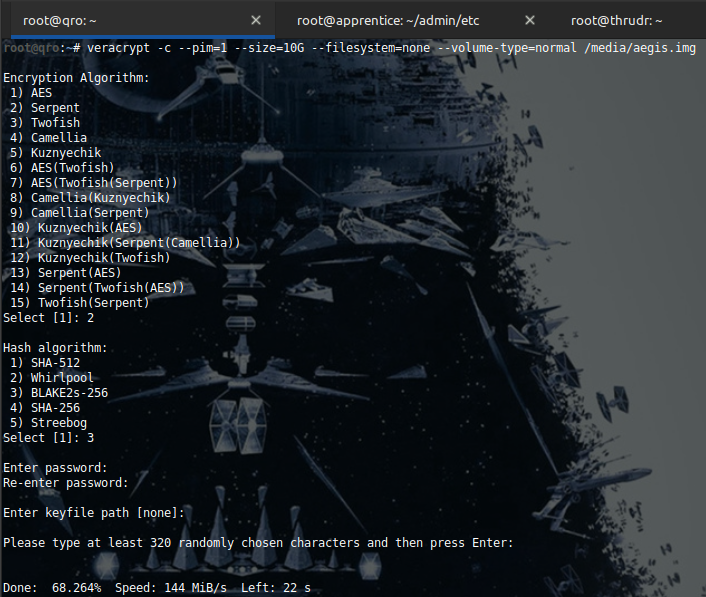
$ sudo veracrypt -c --pim=1 --size=10G --filesystem=none --volume-type=normal /media/aegis.img
VeraCrypt will ask:
 Encryption Algorithm:
The suggestion algorithm is #2, Serpent. Though if your VPS provides AES-NI instructions then algorithm #13, Serpent(AES) will add AES to that at almost no cost.- Hash Algorithm:
Algo #3, Blake2s , is recommended. SHA-512 and SHA-256 are both solid choices too, but not as fast. - Password:
Use a proper password manager (KeePassXC or something similar) to generate your password. Create one that has at least 256 bits of entropy, so on the order of 44 characters in length. A password of sufficient entropy eliminates the need for a PIM. - Entropy:
You'll be asked to enter random keyboard entries. Pasting your password in here isn't a terrible idea, as that ensures the random data has at least as much entropy as your password.
We'll be using btrfs for this filesystem, primarily for its compression support:
$ sudo apt-get install btrfs-progs btrfs-compsize
Mount the Veracrypt container as a block device and format it:
$ sudo mkdir /media/storage
$ sudo veracrypt --pim=1 --protect-hidden=no --filesystem=none /media/aegis.img /media/storage
$ sudo mkfs.btrfs -d single -m single -M -n 4096 -L aegis -f /dev/mapper/veracrypt1
$ sudo mount /dev/mapper/veracrypt1 /media/storage
We'll be using both compressed (email) and uncompressed (MariaDB databases) storage:
$ sudo mkdir /storage/compressed
$ sudo mkdir /storage/uncompressed
$ sudo btrfs property set /storage/compressed compression zstd
Syncthing
Syncthing is employed to signal to the watchdog computer when the server has rebooted and needs assistance mounting the above encrypted storage. Syncthing is also something that's useful to have on the server anyway, as a means of quickly and easily transferring configuration files on and off. It is moderately secure, but without extra measures it should not be trusted with keymat or anything really sensitive.
Syncthing is now in normal Debian repositories, so you can just install it…
$ sudo apt-get install syncthing
Debian packages make it runable as a service. Enable it for the user you want to have run it (likely your main normal user - not root)
$ sudo systemctl enable syncthing@<user>.service
$ sudo service syncthing@<user> start
$ sudo service syncthing@<user> status
By default it will listen on the loopback adapter for the GUI configuration. You can leave this, and use ssh to tunnel to it. An easier way is to change the GUI listen address to use WireGuard.
$ joe /home/<user>/.config/syncthing/config.xml
Look for the line <gui enabled="true" tls="false" debugging="false"> and change the next line from <address>127.0.0.1:8384</address> to <address>10.30.1.1:8384</address> (or whatever you set your server's WireGuard address to). Then restart the service:
$ sudo service syncthing@<user> restart
Now you can navigate a browser to: http://10.30.1.1:8384/ (or whatever you set the server's GUI listen address to) and you should see the Syncthing GUI.
- You'll be asked whether you want to enable anonymous usage reporting. This is a production server, so it's recommended to turn that off. You'll also be asked to set the GUI authentication password, which you should do.
- In Actions→Settings→General you can set your server name, and verify the usage reporting you selected.
- On the Connections tab you'll see checkboxes for “Enable NAT traversal”, “Global Discovery”, “Local Discovery” and “Enable Relaying”. Turn them all off.

- Also on the connections tab you'll see the listen address. Recommend
quic4://0.0.0.0:22000. Click “save”. - In Actions→Advanced→Options you'll see “Enable Crash Reporting”. This is also a good thing to turn off.
- The default folder settings are reasonable and you can retain it. If you do then your shared folder will be
/home/<user>/Sync

Syncthing (on Watchdog)
The method for setting up Syncthing on your watchdog device depends on the type of device. If you have a Debian or Raspbian based device, then setup will be similar to the server. If you use OpenWRT, or a device that supports entware, then the following method and supporting scripts can be used almost directly.
In OpenWRT you can install Syncthing and some of the other utilities the following scripts will need with:
# opkg install syncthing coreutils-nohup logger procps-ng-ps joe joe-extras
If you are using some other type of device, then you can get Syncthing binaries for almost any architecture directly from Syncthing's download page.
Smaller Linux devices like OpenWRT often don't have a startup mechanism for Syncthing, so you may need one:
# mkdir /root/bin
# joe /root/bin/ststart
Ensure the directory structure used in the script exists (the above ststart script uses /root/admin/etc/syncthing/). Be mindful of the type of storage your device has and, if possible, consider using USB or sdcard storage locations.
Since your whole server restart mechanism fails if the watchdog's Syncthing fails, a little cron job script to periodically check it is a good idea:
# joe /root/bin/stcheck
…and add it to the crontab
# crontab -e
The above runs the check every 15 minutes.
The first time you run Syncthing it will generate its config file. Be default Syncthing only listens to GUI connections on localhost. If you're using a smaller device, you won't have a web browser on it to connect with. You'll need to allow GUI connections from a) your device's local LAN address, or b) your device's wireguard address (if you attach it to the server's wireguard. Don't open it up to the world (0.0.0.0), even if it's sitting safely inside your firewall.
# joe /root/admin/etc/syncthing/config.xml
Look for the line <gui enabled="true" tls="false" debugging="false"> and change the next line from <address>127.0.0.1:8384</address> to whatever your decide above.
# killall syncthing
# /root/bin/ststart
Now you can navigate a browser to http://<watchdogui>:8384/ (whatever you set the watchdog's GUI listen address to) and you should see the Syncthing GUI:
 The first time you connect to the GUI, it will give you the same notifications you had on the server asking for permission to phone home and to change the GUI password. It will also complain about being run as root. There will be op open ports on this installation and OpenWrt has limited support for non-root anyway, so you can ignore this warning.
- In Actions→Settings→General you can set your watchdog device's name, and verify usage reporting is as you selected it.
- On the Connections tab you'll see checkboxes for “Enable NAT traversal”, “Global Discovery”, “Local Discovery” and “Enable Relaying”. Turn them all off.
- Also on the connections tab, clear the Sync Protocol Listen Addressses textbox - delete the word
default - In Actions→Advanced→Options you'll see “Enable Crash Reporting”. This is also a good thing to turn off.
- The default shared folder will likely be in
/root/Sync. This is reasonable, but you should again be mindful of wear on your device's non-volatile storage -/root/Syncshould be located somewhere on a USB or sdcard storage. You can't move a Syncthing folder location after it's been created - you have to remove it and re-ad it. Or, stop Syncthing, move the folder, and make the old location a soft-link to it.

You can connect your watchdog's Syncthing to the server's.
- Navigate another browser tab to the server's Syncthing and select Actions→Show ID, click “Copy”
- Go back to the watchdog's Syncthing, select Add Remote Device
- Paste in the device ID from above. You can fill in the server's Syncthing name or, if you leave it blank, it will pick up the name from the server.
- Go to the Advanced tab. You need to enter the server's listen address here. If the watchdog device is on the server's WireGuard network, then you can use the server's WireGuard address. This will add extra security for Syncthing but isn't required. You can use the server's public hostname/IP address, and Syncthing will still be moderately secure For the address delete
dynamicand enter:quic4://<serveraddress>:22000  Go to the server's Syncthing GUI browser tab. You should see a new device connection request there. Check to make sure the device ID matches the watchdog's Syncthing ID and then select Add Device.
- Click on the Sharing tab, make sure introducer and auto-accept are turned off, click to check the
Syncfolder, and click Save. - Return to the watchdog devices Syncthing GUI browser tab. You should get a notification that the server wants to share the
Syncfolder. Accept.

And now your watchdog and server have linked folders /home/<user>/Sync on the server should now mirror /root/Sync on the watchdog device.
Reboot Signalling
Now that we've gone through the pain of linking folders between the server and watchdog, signaling the watchdog when the server reboots is pretty painless. On the server:
# mkdir Sync/etc
# echo 0 > Sync/etc/<SERVERNAME>RebootFlag
# sudo crontab -e
Add this to the crontab:
@reboot sleep 30 && echo 1 > /home/<username>/Sync/etc/<SERVERNAME>RebootFlag
Now every time the server reboots, it will write a 1 to the file, which Syncthing will transfer over to the watchdog.
Encrypted Container Remote Mount
The whole purpose of the watchdog is to enable it to mount the server's encrypted container when the server reboots. We're going to do this with SSH. The password for the encrypted container and also the sudo password for a sudo-capable user (it might as well be your main user) are both going to be sent over SSH. Put them in files on the watchdog:
# touch /root/admin/etc/<SERVERNAME>_container /root/admin/etc/<SERVERNAME>_control
# chmod 600 /root/admin/etc/<SERVERNAME>_container /root/admin/etc/<SERVERNAME>_control
# joe /root/admin/etc/<SERVERNAME>_container
# joe /root/admin/etc/<SERVERNAME>_control
Make sure each file consists of the exact password and one newline. Nothing else.
The server name used for subsequent examples will be “QRO”. Make sure you change accordingly.
References
I've been at this since Debian 7, and so many of these guides are old. But many of them are still valuable references and I include them here as most of these provided at least some guidance to me at one point or another:
Complete Howtos:
- Debian 4 (Etch): Full Mail Server Solution w/ Virtual Domains & Users
- Debian 7 (Wheezy): Debian Wheezy Mail Server
- Debian 7 (Wheeze): Installing Lighttpd With PHP5 (PHP-FPM) And MySQL Support
- Debian 9 (Stretch): Set up a Mail Server with PostfixAdmin on Debian 9
Security:
- How To set up WireGuard VPN on Debian 10 Buster
Most all recent howtos use wg-quick, which I don't like at all. This one is older, but speaks to the better way of doing it as an interface: - Secure Secure Shell
Secure Secure Shell should be required reading for anyone setting up an SSH server. It's old, and a lot of it is no longer relevant, but it's invaluable in understanding the important parts. Seriously, read it. - Securing Lighttpd with SSL/TLS Encryption: an In-Depth Walkthrough
Detailed information on securing Lighttpd
Milters:
- Replacing OpenDKIM with dkimpy-milter
DKIM verification and signing with both RSA and ed25519 keys - How to Use PolicyD-SPF With Postfix
SPF verification (not a Milter per se but works mostly like one)
Other
- How to Install Synchthing on Debian desktop/server
The right way to get Syncthing running in Debian with auto-start/restart.